Removing Float Bowl


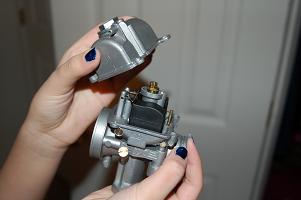
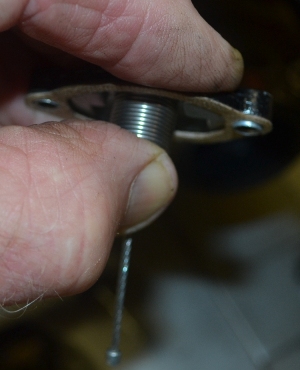
Holding carb upside down with the air adjustment screw towards you, lift the bowl about 1/4" straight up. Tilt the far end up and pull the bowl slightly towards you while lifting. This will keep you from bending the overflow pipe, floats, etc...
Checking and Adjusting the Float Bowl

Check the float level by holding the carburetor udside down, angled over at 45 degrees. When the line across the float is just about parallel to the base the measuremtnt from the base to the bottom of the float will be about 19mm. Originally recommended to us, we have found that the engine will flood when the bike lays over at this height. We recommend a float height of about 21mm from the base to the bottom of the float for best performance. At this height, the line on the float will angle up slightly from the base line. Use a pair of needle nosed pliers to slightly bend the tab the float needle is on to adjust the height.
Carburetor Tuning: Dialing in the OKO
When starting your bike for the first time, try this procedure to get your OKO dialed in for best performance.
Pull to full choke, and give the bike (kickstarter) a few kicks. It should start, but if not, try adding a little throttle. This will have a leaning effect in case the pilot or slow jet is too rich. Once running, take the bike off of choke as it begins to falter and screw in the idle screw enough to keep the engine idling. Let the bike warm up for a couple of minutes. Once warm, turn the air screw in a quarter turn and see if the engine picks up rpms. If it does, the idle circuit is lean and you are on the way to correcting it. If it drops rpms, it is becoming too rich and you need to turn it back out . Continue turning the air screw in 1/8 turns in the direction the rpms increase, until the rpms level out. Use the idle screw during this time to keep the idle low but not in danger of stalling. After each 1/8 turn, give the motor several seconds to adjust to the new setting. Once you have found the area where the engine neither increases nor decreases in rpms you are close to having the idle adjusted. Stop the engine and check to see how many turns out the air screw is. If the air screw is less than one turn out, you will need to switch the slow or pilot jet to a larger size. If the air screw is turned out more than two full turns, you will need to replace the slow jet with a smaller size. When you have reached optimum idle speed with the air screw turned out between one and two turns, you have the idle right or very close. Blip the throttle slightly (not past 1/4 throttle). If the engine "4-strokes", turn the air screw out slightly. If the engine "searches" or returns to idle slowly, turn the air screw in slightly. You are looking for that spot where the engine takes a little throttle cleanly and returns quickly to idle.
Take the bike for a short test ride on a slight incline. Test as if you are in a section with slight uphill turns and see how the bike responds to about a 1/8 throttle opening. If the engine pulls smoothly without loss of power, it indicates the idle and slide cutaway are correct. If the engine 4-strokes when opening the throttle, it indicates a richness on the cutaway or the top portion of the needle. If the engine loses power upon opening the throttle, it indicates leanness above the idle circuit, either on the slide cutaway or the top portion of the needle.
If it seems the idle and cutaway are correct, try throttle openings to 1/4 throttle and to 1/2 throttle. The engine should pull strongly and smoothly if the needle is correct. If the engine 4-strokes or is slow to respond to throttle openings, that is an indication of richness, and you should try lowering the needle by raising the clip a notch. If the engine lacks power or "surges/searches" when the throttle is released, that is an indication of leanness and you should try raising the needle by lowering the clip a notch. (*Note: We are now including a shim for placement under the needle if you find the best mixture is achieved with the clip between two of the notches. The shim places the needle half way between notches.) Once you have found the needle position that offers smooth, clean acceleration with good power, letting the engine return quickly to idle when the throttle is released, you can now try opening the throttle from 1/2 to 3/4 throttle. Find an area with an upgrade where you have enough room to get the bike into third gear, and accelerate to 1/2 to 3/4 throttle. Again, the engine should accelerate smoothly with good power. The needle used in the OKO has been thoroughly tested and is the right needle for the practically all of the applications listed. If the bike is slow to accelerate or 4-strokes nearing 3/4 throttle, the main jet main be too large. Try a slightly smaller size until the bike pulls smoothly with good power. If the engine looses power and "searches/surges" when the throttle is released, switch to a larger main jet by a couple of sizes, and decrease the size until it pulls smoothly with good power and no surging upon throttle release. Once this is accomplished try the bike at full throttle and re-evaluate the main jet again according to the adjustments previously mentioned.
If the carburetor cannot be tuned properly as above, generally the leanness or richness will show up in the area controlled by the slide cutaway, which is just off of idle to about 1/4th throttle. If there is a richness in this area indicated by four-stroking, the cure is to move to the next larger carburetor. If the engine has a weak spot there indicated by lack of power or surging upon throttle release, the cure is to move to the next size smaller carburetor. In the OKO K-101 series, the slides are matched to the size of the carburetor and are not interchangeable as on round slide carburetors. If you are unable to correctly tune the OKO, we will help by providing the proper jets, or by exchanging to a different size carburetor, depending on the issues you have. Though we have tested our OKOs on the machines we sell carburetors for, there can be quite a variation in both intake and exhaust systems which can greatly effect tuning. We will work with you as much as possible to get your OKO dialed in correctly.
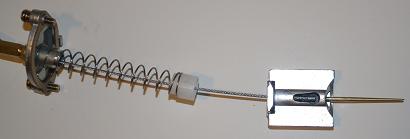
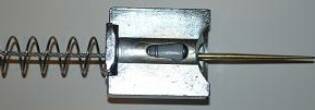
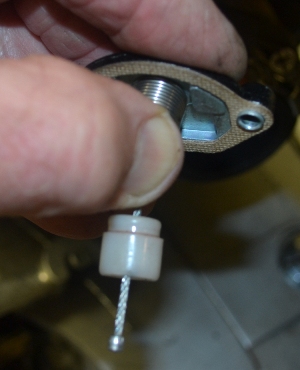
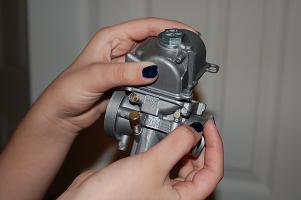
Insert the cable through the carburetor top and spring, fully compressing the spring. Place the white nylon needle holder towards the end of the cable, then put the end of the cable into the top of the slide, letting the nipple rest in the indented "disc". Then slide the nylon holder down first with the flatter edge against the curved side of the slide. If it is put in wrong, it will not hold the needle and cable in place correctly. (See above photo) Then release the spring so it pushes the needle holder down, thereby holding both the needle and cable end in place.
Fixing the Throttle Cable to the Slide
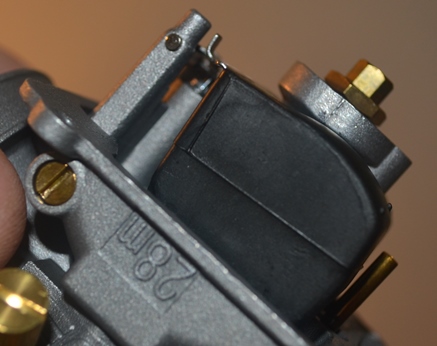
The Jet Block and Gasket
Unlike many other carburetors, OKO's jet block is a part separate from the carburetor body It is held in place with two Philipps head screws that are loctited at the factory. A rubber gasket, placed on the block, seals fuel and air from leaking into the bore. Occasionally, this gasket is either misplaced at the factory, or the glue that holds it in place, clogs a small fuel orifice. A misplaced gasket can have two effects. First, it can leak air through the float bowl and lean the idle, causing the need for a larger pilot jet, and second, it can allow extra fuel to come up into the bore when the bike is jumped or bounced, which will richen the mixture and cause the engine to stumble. To check the jet block for air leakage, with the engine idling, place your fingers over the ends of the overflow vent at the bottom of the float bowl and the vent on the right side of the carb body at the same time to shut off any airflow from outside the carburetor. If this has no effect, or if the idle decreases slowly, you have no air leakage. If the engine loads up quickly, bogs and/or stalls, you have leakage through the gasket and will need to replace it or re-place it. Please note: There is a certain amount of venting needed, so when the vents are shut off, the engine will slowly load up. If this happens very quickly it is the indication of the gasket leaking.
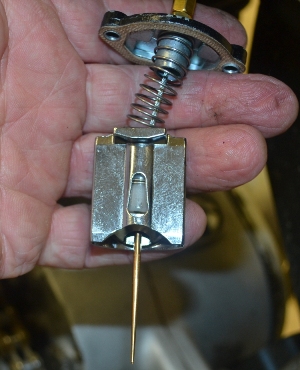
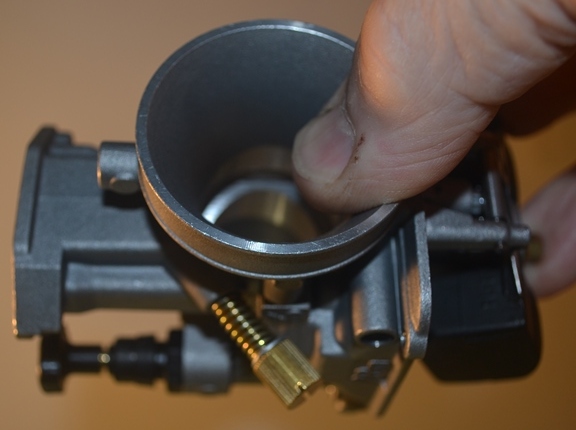
If glue has clogged one of the fuel orifices, it will be impossible to adjust the idle mixture. To check the slow or pilot jet circuit, remove the air screw and place the tube from a carb cleaner can all the way into the air screw hole and squirt some cleaner. Do this while holding a finger over the bottom of the pilot jet and sighting through the bore. You should see two jets of cleaner, one from the pilot hole that is in the bottom of the bore and is angled toward the spigot end, and one from the transition hole that is behind the nozzle (see photo below). I hold the carb body near a vertical piece of paper. The spray from the pilot hole should create a somewhat round wet spot on the paper. If either of these holes are clogged, remove the jet block from the carb body and sqiurt fluid or air through each orifice until they are clear.
Rather than contact us by the text box previously here, we are asking that you contact us via e-mail since many are forgetting to add their e-mail address so we can answer their questions. Our e-mail address is: usaoko@comcast.net or midatlantictrials@comcast.net
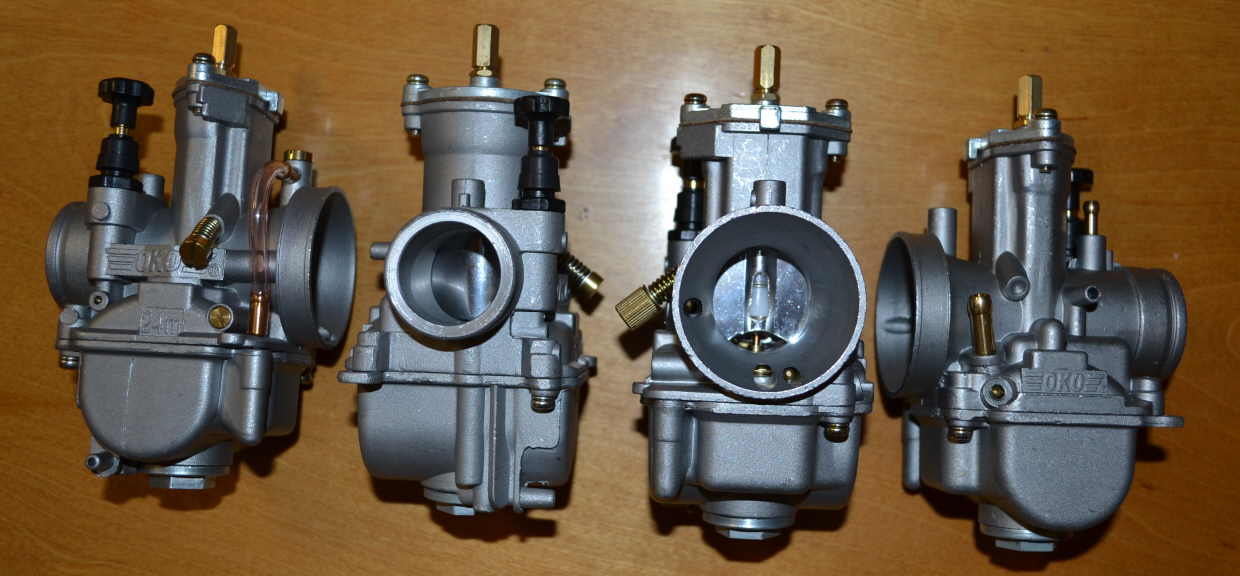
OKO 19mm-30mm Servicing and Tuning
Above are four of the sizes of the OKO K-101 carburetor series. Each have the same outside measurements: 131mm height without cable holder, 83mm length, 65mm width, 49mm intake diameter and 34mm spigot, diameter. Sizes range from 19mm to 30mm. Shown here are from left to right: 24mm, 26mm, 30mm and 28mm. The 24mm is seen with the power jet and comes standard in this form. Other sizes are available with the power jet by special order at this time. The K-105, which is black rather than metallic, isnow available in 21mm, 26mm, 28mm and 30mm. The 30mm has the same low end performance as the 28mm but has a little more top end due to the shape of the bore (third photo from the left).
We set the float height before sending out each carburetor. Photo on the left shows the float height of about 21mm when just closing the flow of fuel.
Photo on the right shows the float needle completely compressed with the carburetor upside down. Note that the line on the float is almost parallel with the bottom of the carburetor body.
The settings as shown have proved to be the best float height for almost all applications.
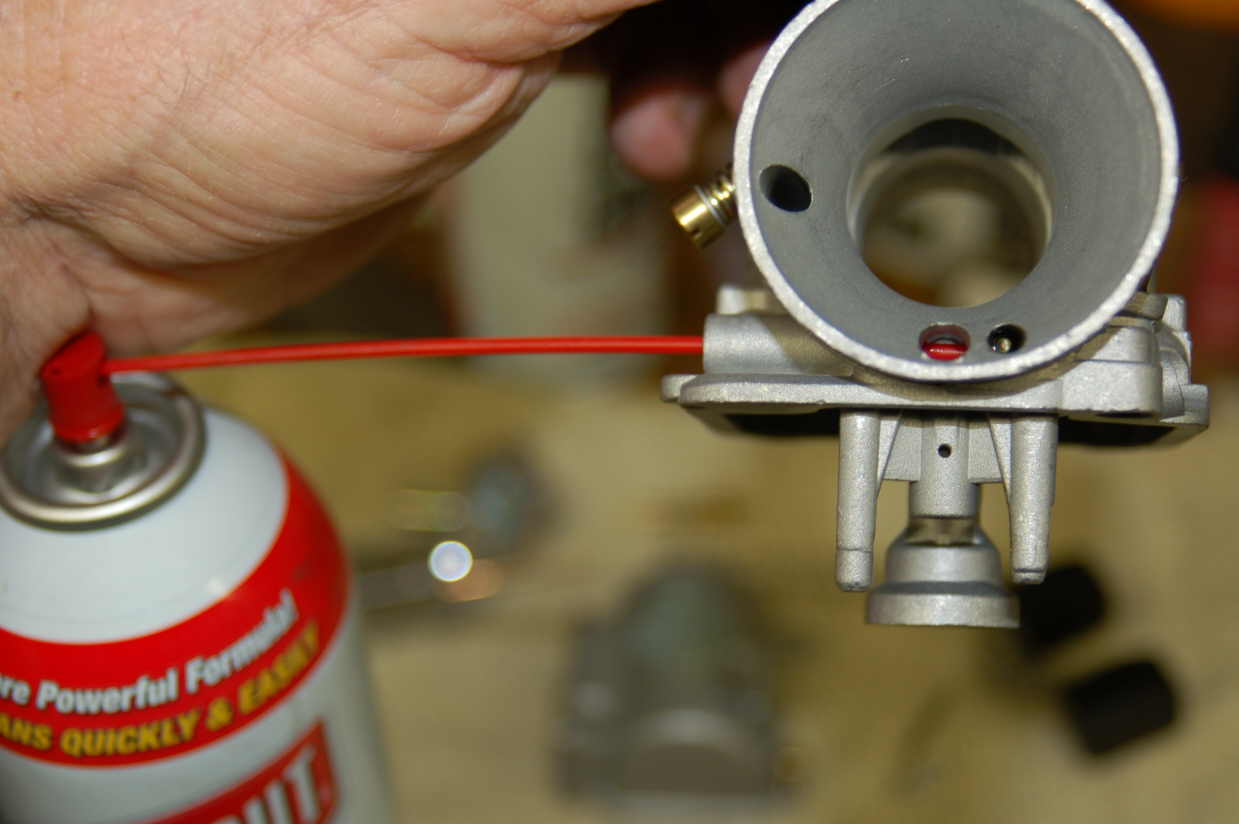
Remove the air screw and insert carb cleaner tube until it bottoms. Put your finger over the pilot jet hole (underneath) and your thumb over the center hole at the bottom of the intake and give a one second squirt of the carb cleaner. Make sure both pilot and transition holes have good flow. I hold the carburetor close to a vertical wall with a paper on it and look through the venturi. You can see fluid shoot staight up from the transition hole. Check the paper on the wall to see the wetness from the pilot hole.
Note: It is imperative that the pilot or slow circuit on the OKOs is dialed in before checking and dialing in the needle and main jet. If the pilot circuit is either too lean or too rich, it will effect the other settings. Once the pilot circuit is right, with the air screw between one and two turns out, then proceed to checking the needle position, and lastly the main jet.
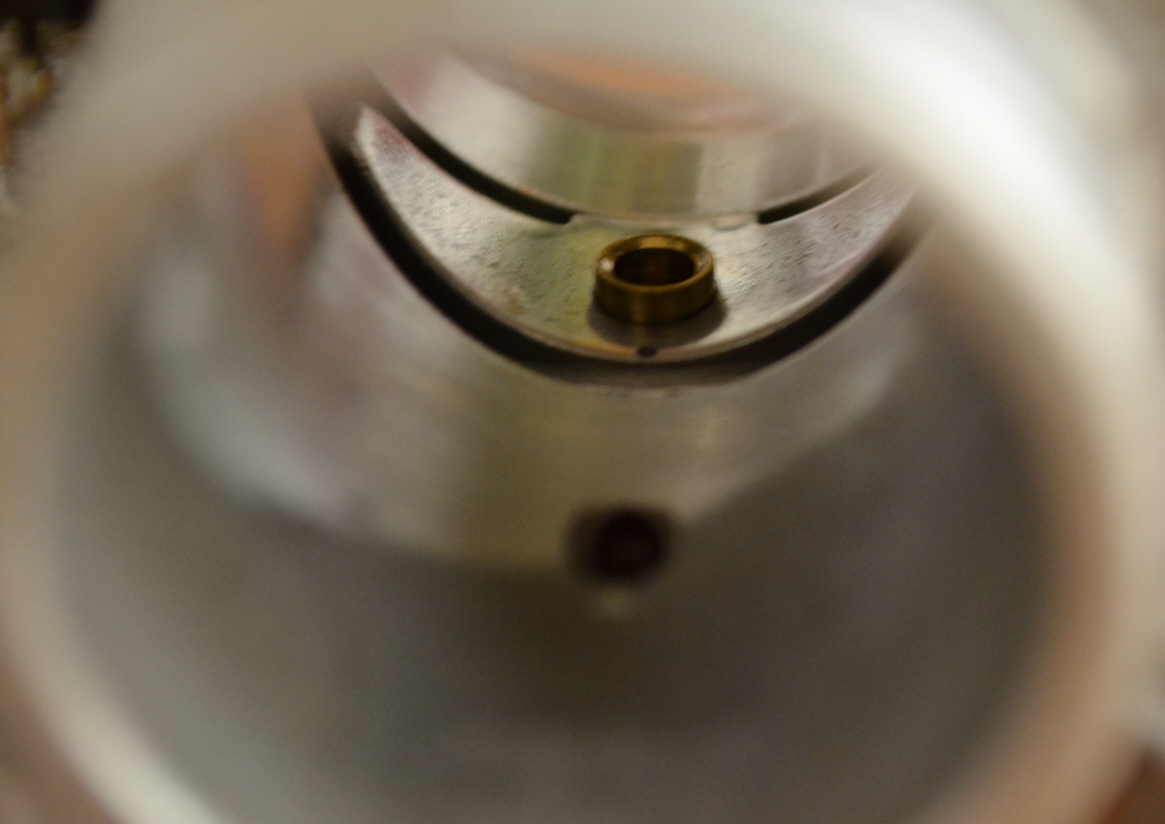
Transition hole is the small hole just in front of the brass nozzle. the pilot hole is recessed in the larger hole nearest the bottom of the photo. Cleaner should squirt nicely, in streams, through both of these holes when they are clear.
Tuning Tips
It is important to adjust the air screw for the final setting after the engine is completely warmed up. The final adjustment should be between one and two turns out. If less than one turn, replace slow jet with a larger one. If more than two turns out, replace with a smaller one.
After adjusting the air screw for optimum idle, blip the throttle just slightly. If the engine four-strokes (two-stroke engine), lean the mixture slightly by turning out the airscrew. If the engine "surges" when the throttle is released, or is slow to return to idle, turn the air screw in a little to richen the mixture.
Always tune the carburetor from the "bottom, up". Start with the idle, then check the needle, and last, the main jet.
With the idle tuned correctly and the clip on the needle in the right "notch", if the carburetor has a lean spot just off of idle, the carburetor is too large for your application. If just off of idle, you have a rich spot, the carburetor is too small for yor application.
Especially on Two-strokes, after use of the choke, it will be necessary to "clear" the engine of the richened, choke mixture before determining the correct needle position and main jet. If the engine "four-strokes" at larger throttle openings, run at these openings to clean out the choke mixture.
Two-strokes especially, can "carry-over" a rich or lean area to other throttle openings. A rich or lean idle will affect larger throttle openings, causing them to seem lean or rich. Also, a bike that seems dialed in until run hard, and then shows richness or leanness at small throttle openings, may have carry-over from a rich or lean main jet.
If your engine runs well while vertical (left to right), but loads up when on the side stand, check for idle richness and float height and adjust accordingly. A leaky jet block gasket will also show this sympton.
Typically, a correctly tuned carburetor, will pull strongly and smoothly at all throttle openings, and return to a smooth idle after being run fairly hard.
If this is not the case, run the engine for several seconds at various throttle openings (no blipping) to determine where the problem exists.
Running at idle: Size of pilot or slow jet and airscrew adjustment.
Just off of idle to 1/4 throttle: This is the transition area between the idle circuit and the needle. Unlike round slide carburetors, the OKO does not have different cutaways for the slide. If this area indicates leanness, there is not enough flow through the bore to pull fuel through the needle jet when the idle circuit is at its maximum. The cure is to switch to a smaller sized carburetor or slightly thin the upper portion of the needle before the taper by about one thousandth of an inch. If this area runs "rich", fuel is being pulled up through the needle jet too early due to extra vaccuum created by too small a bore. The cure is to switch to a larger sized carburetor.
1/4 to 1/2 plus throttle: The position of the needle determines the mixture at these openings. As the throttle is opened close to 3/4, the main jet will also be a determining factor. If the bike runs well at 1/4 throttle but not 3/4 throttle, check the main jet. If it runs poorly at 1/2 throttle, but okay at 3/4 throttle, adjust the needle height.
More than 1/2 throttle to full throttle. Running at or near full throttle, the mixture is controlled by the main jet. The right sized main jet will pull strongly and smoothly. If your bike runs okay at near full throttle, but either loads up or leans out after running at those openings, try adjusting the main jet size accordingly, as "carry-over" from too rich or lean a main jet can affect the idle after running the engine hard.
Final note: When engines get hot, carburetion can change drastically. Trials engines, especially, get hot due to limited cooling since they are often not moving quickly enough for the engine fins to properly cool the barrel, etc... Also, exhaust heat will affect the carburetor's fuel temperature if the exhaust pipe is routed close to it. This will also change carburetion. Air leaks, either manifold, head, or crank seals, will change carburetion. If carburetion changes during usage, check for these things as well as for a clogged jet or idle circuit. The OKO is a precision instrument, and will out-perform virtually all round slide carburetors, but they must be properly tuned and maintained for best performance. Always use fresh, high (enough) octane gas, and use a good quality fuel filter. Also, make sure you use a good quality air filter and clean it as needed. When clogged it will tend to richen the mixture.
OKO K-101 Dimensions: Intake 49mm, Spigot 34mm, Height 131mm, Length 83mm, Width 65mm
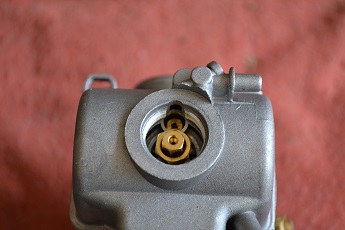
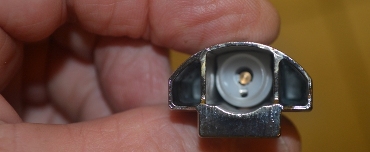
In the photo to the right, the drain plug has been removed from the bottom of the float bowl, exposing the main jet (center jet) and the slow jet (recessed). We have removed the bowl of this carburetor and filed a notch below the slow jet so that it can be removed with the float bowl on, and often with the carburetor on the bike. The notch was created with a 7/32" chain saw file. Just be carful not to open it up too much so that the seal between the bowl and the drain plug is not compromised.
Fuel Leakage at the Float Bowl or Overflow Pipe
Occassionally I get calls about fuel overflowing from the Float Bowl or the overflow pipe at the bottom of the carburetor. Usually this is due to a small piece of debris lodged between the float needle and its seal in the carburetor body. This often happens when either no fuel filter is used, or a cheap one. So the first thing to do is make sure you have a good fuel filter in place. Remove the bowl, push out the pin holding the float in place and remove the float and needle. Make sure the needle is clean, and take a cotton swab and spin it in the needle seat to remove any debris. This is the usual fix, but if you still get overflow, the next most likely issue is the overflow tube in the bowl has gotten bent when the bowl was removed. To avoid this, follow the directions above when removing the bowl. If the tube has gotten bent, it may rub against the float and keep it from moving freely, thus preventing it from sealing. Try adjusting the position of the tube so that the float moves freely. Place the bowl on the carburetor and gently shake it up and down. You should hear/feel the float move. Now take a short piece of fuel hose, and holding the carburetor upside down, blow throught the hose. No air should move through the hose. If it does, the tube is still holding it. The only other known issue with overflowing is if the bowl gaskiet is not properly in place. Then the fuel will flow out between the body and the bowl. The gasket can stretch if carb cleaner is applied to it a few times. If this happens, replace the gasket, making sure it fits in the groove for it. Please note: When adjusting the float height, check to make sure the individual floats are aligned with eachother to insure proper float height.